Back to: COMPUTER SCIENCE JSS2
Welcome to Class !!
We are eager to have you join us !!
In today’s Computer Science class, We will be discussing Graphics Packages – Paint. We hope you enjoy the class!

GRAPHIC PACKAGES: PAINT
Paint is a simple raster graphics program installed in all versions of the Windows operating system. It can be used to scan images, create and modify objects.
It can open and save files in the following formats: Jpeg, Gif, PNG, TIFF and bitmap (.bmp). The bitmap file extension can be monochrome, 16 colour, 256 colour and 24-Bit bitmap.
Starting Paint Program
To start a paint program the following steps are to be followed:
- Click on Start Menu
- Navigate to all program and click on it
- Navigate to accessories or window accessories and click on it
- move to paint program and click on it.
Features of the Paint Environment
Paint is a software from Microsoft Inc. It allows one to create, customize and paint graphics or images.
Tools in the Toolbar
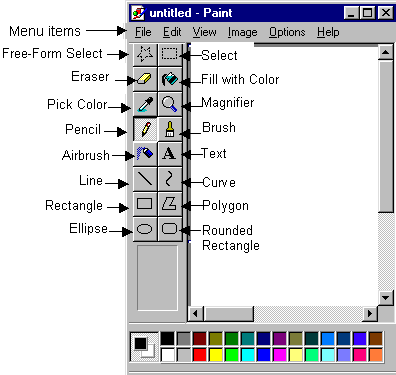
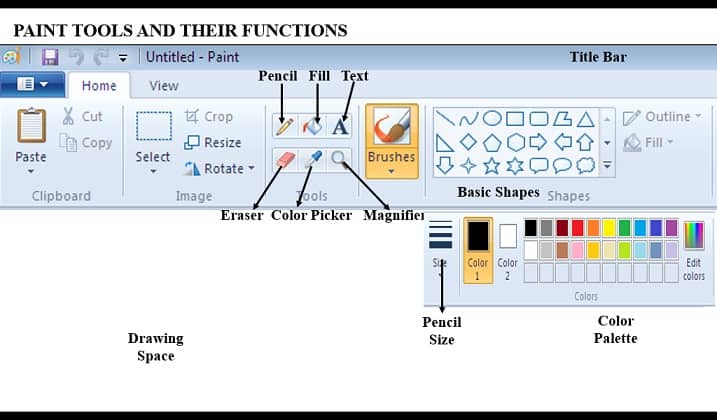
The paint toolbox has sixteen tools. The names of the different tools are shown in the diagram below:
Functions of Toolbox Tools
Free-form select:
A free-select tool is a tool used to select objects that have been drawn in the drawing area
Rectangle Select tool:
The Rectangle select tool is also used to select objects in the drawing area.
The eraser tool:
It is used to remove mistakes that have been made in a drawing. The size of the eraser can be adjusted to remove either big or small areas of a drawing
Fill colour tool:
This is also known as a paint bucket tool. It is used to fill objects that have drawn with any colour of your choice.
Pick colour tool:
The pick colour tool is used to pick or select a colour from pictures.
Magnifier tool:
The magnifier tool is used to make objects in the drawing area appear bigger.
Pencil tool:
The pencil tool is known as the default tool in the paint program. You can use the pencil for drawing just like a real-life pencil. You must click and drag the mouse pointer to use the pencil tool.
Brush tool:
The brush tool works like a real-life brush. You have different brush options to choose from in the toolbox.
Airbrush tool:
The airbrush tool is used to spray colour over an object. The airbrush tool works like a spray can. The amount of colour spray over a particular area depends on how long you hold down the mouse button and keep it in the same area.
Text tool:
the text tool is used for inserting text into the drawing.
Line tool:
The line tool is used to draw horizontal, vertical and diagonal lines.
Rectangular tool:
The rectangular tool is used to draw rectangles and squares of different sizes.
Curve tool:
The curve tool is used for drawing curves from a line. To draw a curve line, you must first draw a line with the tool, and then click on any part of the line and drag the mouse pointer to create a curve on the line.
Polygon tool:
The polygon tool is used to draw straight line objects with different shapes and sizes. You can use the polygon tool to draw a triangle, star, rhombus and many other polygons.
Ellipse tool:
The ellipse tool is used for drawing ovals and circles of different sizes.
Rounded rectangle tool:
It is used for drawing rectangles and squares of different sizes with rounded edges.


Using the Paint to draw
Draw a line:
Use Line in the shapes box to draw a straight line. Click Line, click a line width in the size, click a colour in the Colour palette, and then drag the pointer in the drawing page to draw the line. To draw a line using the background colour, right-click while you drag the pointer.
Draw a curve:
Use the Curve in the shapes box to draw a smooth, curved line. Click Curve, click a line width in the sizes, click a colour in the Colour palette, and then drag the pointer in the drawing page to draw a straight line. After you have created the line, click the area in the picture where you want the arc of the curve to be, and then drag the pointer to adjust the curve.
Draw a rectangle and a square:
Use Rectangle in the shapes box to draw rectangular shapes. Click Rectangle, click a colour in the Colour palette, and then click a size. To draw a rectangle, drag the pointer diagonally in the direction you want. To draw a square, hold down SHIFT while dragging.
Draw an ellipse or circle:
Use the Ellipse to make ellipses and circles. Click Ellipse in the shapes box, click a colour in the Colour box, and then click a size. To draw an ellipse, drag the pointer. To draw a circle, hold down SHIFT while dragging.
Enter a text:
Use Text to enter text in your drawing. Click Text, and then, click a background colour. Click a colour in the Colour palette, and then click on the drawing and type your text. You can resize and move the text box, and change the font, font size, and text formatting until you click another tool or click outside the text box within the drawing.
We have come to the end of this class. We do hope you enjoyed the class?
Should you have any further question, feel free to ask in the comment section below and trust us to respond as soon as possible.
In our next class, we will be talking about the Benefits and Disadvantages of ICT. We are very much eager to meet you there.

when are we doing the practical of it