Back to: Botany 400 Level
My ever-ready Afrilearn champ, how far? How you dey this beautiful day wey brain work dey sweet pass chilled zobo? I’m super glad say you show face again because today’s topic na one real-life plant-growing miracle wey dey happen daily inside labs across Nigeria and the world. We dey talk about Stages of Micropropagation — a powerful tool wey dey help scientists and farmers grow thousands of healthy, identical plants from just one small tissue. You ready? Let’s gist well-well.
Stages of micropropagation
Imagine you get one special tomato variety wey dey resist disease and produce sweet, red fruit wey dey last for market. Instead of planting plenty seeds and waiting, you can grow hundreds of identical, healthy tomato plants from just a tiny piece — na this miracle be micropropagation. It’s a step-by-step process, and today, we go waka through each stage like person wey dey follow clear map.

What is Micropropagation?
Micropropagation simply means growing new plants from small tissues in a laboratory setting. The main aim na to multiply plants quickly, and get uniform, disease-free, and vigorous crops.
E get five main stages, and each one dey important like jollof rice with the right stew.
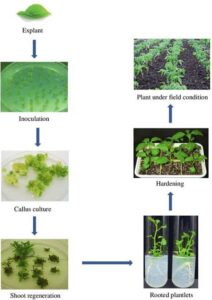
Stage I – Initiation Stage
This na where everything start. A small piece of plant tissue (called an explant) is taken from a healthy mother plant — like the leaf, node, or root.
- The explant is sterilised to kill germs.
- Then it’s placed on nutrient medium (like Murashige & Skoog) with the right hormones.
- Goal: Get the tissue to survive and begin growing.
Stage II – Multiplication Stage
Now, the tissue don wake up and start to grow.
- Scientists adjust the growth hormones (especially cytokinins) to make the explant produce multiple shoots or callus.
- These shoots are separated and re-cultured, multiplying the number of plants sharply.
- From one explant, you fit get 50–500 shoots in a short time!
Stage III – Rooting Stage (Pre-transplant)
At this point, the shoot wey grow need root.

- Scientists transfer the shoots into a new medium with more auxin to encourage root development.
- Now the baby plant is looking like real plant — shoot + root!
Stage IV – Acclimatisation (Hardening)
This stage na like when boarding student dey come home for holidays — they need to adjust!
- The plantlets are removed from the sterile environment and gradually introduced to real-world conditions — light, temperature, and soil microbes.
- First, dem go to a greenhouse, then to open field.
Stage V – Transfer to Soil
Final stage!
- The now-strong plants are transplanted into the field, nursery, or garden for full growth and harvest.
- They are monitored to ensure survival.
At the International Institute of Tropical Agriculture (IITA) in Ibadan, scientists dey use micropropagation to produce improved yam and banana varieties. With this method, farmers dey get healthy planting materials fast, clean, and in plenty numbers — no need to wait years or deal with diseased suckers.
Summary
- Micropropagation is the lab-based method of growing many identical plants from a small tissue.
- The stages include: Initiation, Multiplication, Rooting, Acclimatisation, and Transfer to Soil.
- It helps produce healthy, fast-growing, and disease-free plants for farming, research, and conservation.
Evaluation
- What is micropropagation used for?
- Name the five stages of micropropagation in correct order.
- What is the purpose of the rooting stage?
- Why is acclimatisation important?
You just dey grow your knowledge garden one strong leaf at a time! I dey proud of how you dey soak in these concepts. With this kind understanding, your future lab or agri-business go surely change the game for good. Afrilearn dey salute your hustle and we dey ride with you all the way. Ready for the next one? Let’s go again!