Back to: BASIC TECHNOLOGY JSS3
Welcome to class!
In today’s class, we will be talking about oblique drawings. Enjoy the class!
Drawing Practices – Oblique Drawings

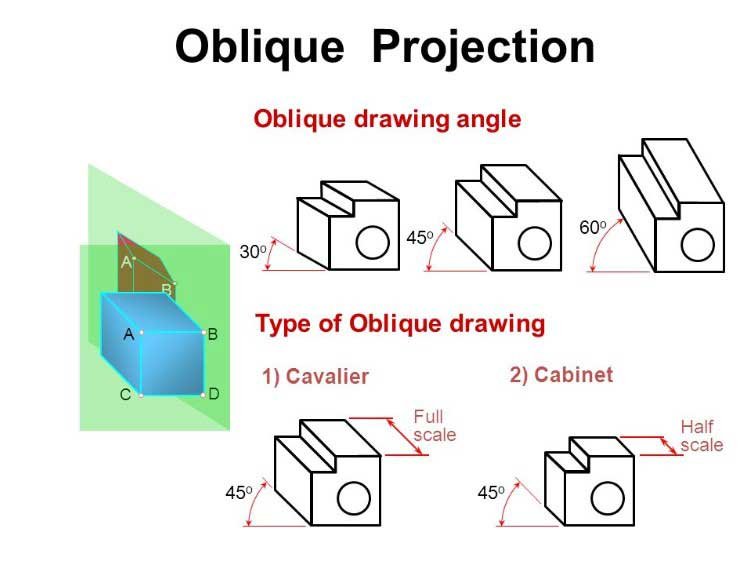
Oblique drawing is also a pictorial method of drawing. In oblique projection, the object is drawn with one of its face true to dimensions i.e. a face is parallel to the horizontal plane. The receding or oblique lines may be drawn at angles 30⁰, 45⁰ or 60⁰, but 45⁰ angle is mostly used.
The only disadvantage of oblique drawing is that it distorts the drawing and can never look natural. Therefore, to prevent this distortion, the receding axes (widths) are usually drawn half-size.
Types of oblique drawings
There are two types of oblique drawings. These are:
- Cabinet projection
- Cavalier projection
Cabinet projection:
This is a situation where an oblique block is drawn full length, without alteration or distortion of the original dimension.
Cavalier projection:
In this method, where the horizontal line is drawn full size while the 45⁰ slant is drawn half size.
Steps Involved in oblique projection
Stage 1: Using the 45⁰ set-square, tee-square, and drawing board, draw the oblique axes as shown on any given block.
Stage 2: Next, locate all given points on any given block according to the dimensions given. e.g. length, breadth and height.
Stage 3: Finally, you complete by outlining your work.

Note: Unless you are given specific instructions, all oblique drawings should be carried out at an angle of 45⁰ and dimensions reduced by half. This is very important in an examination setting.
In our next class, we will be talking about PERSPECTIVE DRAWING. We hope you enjoyed the class.
Should you have any further question, feel free to ask in the comment section below and trust us to respond as soon as possible.

Thank u so much
Thank you