Back to: BASIC TECHNOLOGY JSS3
Welcome to class!
In today’s class, we will be talking about orthographic projection. Enjoy the class!
Orthographic Projection

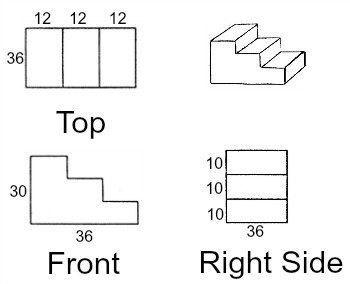
It is a method of drawing an object using plane views. Orthographic projection can be defined as a two-dimensional drawing that shows different views of a structure. It contains vertical and horizontal planes.
This is the method of drawing an object in which the shape of an object drawn to make a right angle to the plane views.
NOTE: Orthographic projection is the means to project on the planes at right angles.
In orthographic projection, there are three basic views referred to as elevations. These elevations are as follows:
(i) The plan:
This is the view of an object as seen or projected from the top.
(ii) Front elevation:
This is the view of an object as seen or projected from the front side of the object or block.
(iii) End (Side) elevation:
This view is sometimes referred to as the auxiliary vertical plane in some textbooks. It is the view showing the right or left side of any object when viewed from the front.

Angles of projection
1. First angle projection:
This method of projection is used where the plan of a structure is positioned below the quadrant. It is the British system of drawing elevations.
2. Third angle projection:
This is a condition where the plan of a structure is positioned above the quadrant while the front view is below the plan. This is the American system of orthographic projection.
Steps in orthographic projection
(I). Sketch the required views.
(ii). Draw both the vertical and the horizontal axis to intersect midway.
(iii). Determine the placing of the views.
(iv). Begin drawing with either the plan or front views.
(v). From either of the views drawn above, project lines for the other view.
(vi). Draw the reflector line at 45⁰.
(vii). Project the horizontal lines from the front elevation.
(viii). Project the plan to meet the reflector line of the 45⁰.
(ix). Take note of hidden details and outline the elevations to complete the job.
Drawing dimension technique
- The dimension should be placed outside the drawing.
- The projection lines are drawn out from the object sides and the dimension line is placed with a thin line between them.
- All dimension line with moderate arrowhead must be parallel to the view being dimensioned.
- Dimension lines must not be clumsy and must not cross another line.
- The dimension is placed centrally or above the extension of one of the arrowheads.
- The unit of measurement must be shown on the drawing.

In our next class, we will be talking about SCALE AND SCALE DRAWING. We hope you enjoyed the class.
Should you have any further question, feel free to ask in the comment section below and trust us to respond as soon as possible.
