Back to: Botany 300 Level
Hello, my brilliant friend! I hope you’re having a fantastic day! Have you ever wondered how scientists study the tiny parts of plants? Since plant tissues are too small to see with the naked eye, we use special techniques to prepare them for viewing under a microscope. This involves cutting very thin sections and staining them to highlight important structures. Today, we’ll learn how to prepare plant tissue sections and apply staining techniques to make microscopic details clearer.
Preparation of tissue sections and staining techniques
Understanding Tissue Sectioning and Staining
When scientists want to study plant tissues, they follow three key steps:
Collecting the tissue sample – Taking a small piece of plant tissue (leaf, stem, root, etc.).
Preparing thin sections – Cutting the sample into thin slices so that light can pass through it under a microscope.
Staining the sample – Using special dyes to colour different parts of the tissue, making them easier to see.
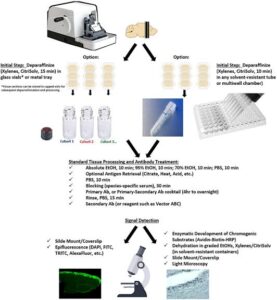
How to Prepare Tissue Sections
1. Collecting the Plant Tissue
Select a fresh part of the plant (leaf, root, or stem).
The sample must be small and healthy to get clear sections.
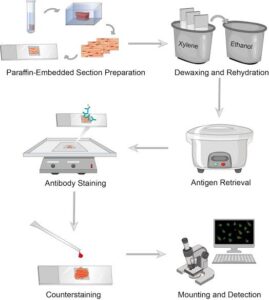
2. Fixation (Preserving the Tissue)
The tissue is placed in a fixative solution (e.g., formalin or alcohol).
This prevents decay and maintains the natural structure of the cells.
3. Embedding (For Support While Cutting)
Soft tissues need support to cut thin sections.
The sample is embedded in paraffin wax or frozen in ice.
4. Sectioning (Cutting Thin Slices)
The tissue is cut into thin slices using a tool called a microtome or a sharp razor blade.
The sections should be thin enough for light to pass through
5. Mounting on a Microscope Slide
The thin section is placed on a glass slide with a drop of water or mounting medium.
A coverslip is placed over it to protect the sample.
Staining Techniques in Plant Tissue Studies
Plant tissues are often transparent, so scientists use stains (dyes) to highlight different parts of the cells. Different stains help us identify cell walls, nuclei, xylem, phloem, and other structures.
Common Staining Techniques
Safranin Staining
Stains lignin and cell walls red.
Used to identify xylem, sclerenchyma, and other woody tissues.

Iodine Solution Staining
Stains starch in plant cells blue-black.
Used to test for starch in leaves during photosynthesis experiments.
Methylene Blue Staining
Stains nuclei in plant cells blue.
Used to study cell division and structure.
Fast Green Staining
Stains cytoplasm and non-lignified cell walls green.
Often used alongside safranin to differentiate structures.
Hematoxylin Staining
Stains chromosomes and nuclei dark purple.
Used in cell division studies (mitosis and meiosis).
A Simple Story to Understand This Concept
Imagine you are reading a book printed with invisible ink. Without a special light, you can’t see the words. But when you shine a UV light, the words appear clearly! That’s exactly how staining works in plant tissues—it makes invisible details visible under the microscope!
Why Are Tissue Sectioning and Staining Important?
Helps identify different plant tissues like xylem, phloem, and epidermis.
Helps scientists study plant diseases by looking at infected cells.
Used in agriculture to improve crops by understanding plant structures.
Helps in plant genetics and breeding research.
Summary
Tissue sectioning is the process of cutting thin slices of plant tissue for microscopic study.
Fixation, embedding, and sectioning help preserve and prepare plant tissues.
Staining helps highlight different cell structures for better visibility.
Common stains include safranin, iodine solution, methylene blue, and fast green.
These techniques help scientists understand plant growth, development, and health.
Evaluation
- Why do we cut plant tissues into thin sections before viewing under a microscope?
- What is the purpose of staining in plant tissue studies?
- Name two common stains and their functions.
- Why is fixation important in tissue preparation?
- How does tissue sectioning help in agriculture?
You are doing an amazing job! Now, the next time you see a beautiful plant, remember that inside it, there’s a whole microscopic world waiting to be explored! Keep learning with Afrilearn, and I’ll see you in the next exciting lesson. Stay curious and keep growing!