Back to: Computer Science JSS 3
Welcome to class!
In today’s class, we shall be talking about the starting excel worksheet. Please enjoy the class!
Starting Excel Worksheet
Welcome to the wonderful world of Excel, where spreadsheets transform data into insights! To kickstart your Excel journey, let’s delve into the essential steps of starting a new worksheet. Buckle up, as we embark on a comprehensive and easy-to-understand class note adventure!
- Launching Excel:

Windows: Click the Start button (usually bottom left corner) and type “Excel.” Select the program icon when it appears.
Mac: Open Launchpad (usually in the Dock) and click the Excel icon.
- Choosing Your Canvas:
Blank Workbook: This is the default option, offering a clean slate for your data adventures. Click “Blank workbook” if you’re starting from scratch.
Templates: Feeling overwhelmed? Excel provides pre-formatted templates for various tasks, like budgets, calendars, and invoices. Explore the selection and choose one that fits your needs.
- Navigating the Worksheet:
Cells: The basic building blocks of Excel, arranged in rows (numbered) and columns (lettered). The intersection of a row and column forms a unique cell address (e.g., A1 for the first cell).
Ribbon: The horizontal toolbar at the top provides access to various formatting and editing tools. Explore the tabs and icons to discover their functionalities.
Formula Bar: Located below the ribbon, this displays the content of the currently selected cell and allows you to enter formulas for calculations.
- Entering Data:

Click a cell: This makes it active, ready to receive your input.
Type your data: Numbers, text, dates, or even formulas can be entered into cells.
Press Enter or Tab: This moves your input to the cell and highlights the next one for further data entry.
- Saving Your Work:
Click “File” then “Save As.”
Choose a filename and location: Remember where you saved your file for easy access later.
Click “Save.”
Bonus Tips:
Formatting: Right-click selected cells to access formatting options like font, alignment, and borders.
Autofill: Drag the bottom right corner of a filled cell to automatically copy its content to adjacent cells.
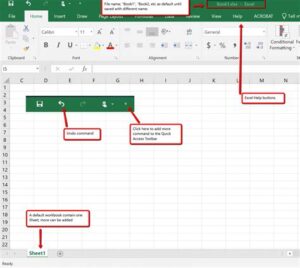
Undo/Redo: Mistakes happen! Use the “Undo” (arrow pointing left) and “Redo” (arrow pointing right) buttons to fix them easily.
Remember: Practice makes perfect! Don’t hesitate to experiment and explore. The more you use Excel, the more comfortable and confident you’ll become.
We have come to the end of today’s class. I hope you enjoyed the class!
In case you require further assistance or have any questions, feel free to ask in the comment section below, and trust us to respond as soon as possible. Cheers!
Question Time:
Section A (Multiple Choice):
- What is the default option when opening a new Excel file?
- a) Blank workbook
- b) Template gallery
- c) Existing saved file
- d) None of the above
- Which key do you press to move to the next cell after entering data in the current cell?
- a) Enter
- b) Tab
- c) Esc
- d) Space
- What is the unique address of the cell located at the intersection of the third row and fourth column?
- a) A4
- b) C3
- d) D1